Tuesday, June 28, 2011

Cowl Dress and Inspiration...

Anybody remember this fabric...
  
?
Well, I've finally done something with it! Recently I discovered this wonderful sewing patterns website, where the patterns are available in download form and everything is really, really cheap. I wouldn't buy patterns from anywhere else really- the service is quick and reliable, all of your downloads remain on a kind of "user" page, where you can print them again and again, and they have quite a wide variety of brands and styles. When I had one complaint about what I thought was an unfinished pattern, they were very quick to respond and point me in the right direction- I continued sewing the very next morning. Well, anyway, a while ago I downloaded this pattern;

McCalls 6161, here it is on sewingpatterns.com
and when I went fabric shopping I kept it in mind and bought the khaki fabric. I ended up buying about 3 meters of it, because I thought, as dress D (bottom right) is cut on the crosswise grain, that it would take up a lot more fabric. I was totally wrong, and I now have heaps of fabric left over. More on that later. The only struggles I had with this pattern were;
a) If you download, the pattern pieces come on two different PDF files, so you need to look for pattern 2 and print that as well, which I didn't realise, and then sent an almost rude email to the service people, (sorry!).
b) The cowl neck is actually separate, but I am going to sew mine on because as a separate piece I can see the neckline underneath it, which looks a bit tacky I think.
c) I used black thread in my machine when I should have used khaki so that it wouldn't have shown. Next time I will take the time to go out and find some matching thread.
d) Make sure you have tailors chalk for when you are cutting the pattern pieces out- because you need to lay down, cut one half, and then flip the pieces over and cut out the second half so it is one big piece. The tailors chalk will mean you can draw outlines to help you flip it over accurately.

Here's how it turned out...
I really love how it fits- although this picture isn't the best for showing it- it is nice and tight at the bottom which accentuates my curves, and then the top drapes loosely hiding my tummy. Because it is loose, it doesn't get hot under there- really it is perfect as an autumn dress. Looks great with tights and gumboots :)
While I am on a blog about the fantastic sewing patterns website, here is a wishlist in photo form...


This dress reminds me of the stunning green evening gown worn by Keira Knightley in the film Atonement, my favorite film and book. If you have a copy or can rent a DVD, do, and watch it a second time with the directors commentary on. It is very, very interesting- it made me want to marry the director! Here is her dress;

Just stunning. The movement of the fabric as she walks, to me, evokes fluttering trees and the way long grass sways in the wind like an ocean. When I was little, I had a picture book of Robin Hood and Maid Marian, and this dress reminds me so much of that book.

Just one last photo of the lovely sunny before I go...

helenxx

Monday, June 20, 2011

Modelling the Presents...

Just a quick blog to show you how the presents looked on my little sister...


Hope the quality is good enough.
helenxx

Sunday, June 19, 2011

Scrapbooking and Skirting Around the Details...

I spend quite a lot of time on the internet, surfing through other people's blogs, on Burdastyle, online shopping stores and ebay, fashion house websites which show their collection, and also on magazine websites. I probably bookmark about 10 items of clothing a day. The trouble is, although bookmarks seem like a perfect and sensible way to keep inspiration on hand, they simply aren't for me. I forget that they are there, I forget what they show, or I might be downstairs in my sewing room, and can't be bothered to walk up the stairs, turn the computer on, find the bookmark and follow it up. So, this week, I found a solution! I've gone back to scrapbooking!
I purchased a $1 scrapbook from the newsagents, some glue and some scissors from Safeway, (sorry, Woolworths) and spent an hour cutting and pasting. It was really fun to go back to something that was such a pleasure as a child- I was even doing my cutting and pasting on an old school desk I found on hard rubbish, complete with holes for the ink wells. It also reminded me of the hundreds of hours I spent on creating folios for the last three years of high school, and how glad and sorry I am that that aspect of education is over for me. Well, temporarily over for me, as I am thinking about going to TAFE next year to do Fashion Technology. Anyway, here are some pictures;


I loved this skirt from the moment I saw it because it is so dramatic- you can't not turn your head, whether you like it or dislike it. The photography is stunning as well, I'm not sure how well you can tell in this picture, especially as it was cut out, but the model is posing on a flight of stairs, which create a leading line in the picture that mimics the line of the dress and accentuates it's length and size. It is such a glamorous photograph, the angle of the photographer as well- looking up at this larger than life model, like we look up to celebrity and fashion. I can only describe the photographer's prowess as intuitive- that is the word which constantly comes to mind.

I adore back details on dresses! The dress on the right should be familiar for regular readers. The others are all off the Urban Outfitters website. I am determined to sew each of these into a dress, but I will have to learn to actually sew a basic dress first.

A fantastic way to wear leggings. So elegant and understated. Now that I have learned to sew leggings, I am determined to find some fabric from which I can make soft ones like these to roll up. Pity she has such skinny ankles though. Possibly needs to eat some avacado on toast.


I love my new scrapbook already. It is so handy to have something sitting next to you all the time, that you can refer to while sewing for ideas. I am also going to print out tutorials from people's blogs, so I can have them on hand as well. Another useful tool I have found recently is an ereader. My mother bought me an Adobe Kobo ereader recently as a very early birthday present. There are some at Borders that are selling at the greatly reduced price of $111, go out and get one now! For print at home patterns they are very useful- rather than printing all the instructions and using up more precious paper and ink, you can download the PDF files onto your ereader and take that into your sewing spot instead. Hopefully soon bloggers and websites will begin to make more things into PDF format- such as the "make it" option on Burdastyle, which would be fantastic as a downloadable PDF file. Knitting patterns also can be downloaded onto your ereader, I know my mum often uses it for that purpose.
Onto my next project- a skirt! I had originally decided I would use the fabric below to make a mini skirt, until I realised I could make both a mini skirt and a maxi skirt from it. It was in part inspired by the leopard print maxi skirt pictured in the scrapbooking photos. I realised recently that when I was a bit younger, I wore a lot of clothing that was really bright, vivacious, and just fun to wear. But the last few years, probably in part because of high school peer pressure, I lost sight of that and stopped having heaps of fun with what I was wearing. So, this skirt was part of a mission to rekindle that fire! Oh, and also, the photos below are a mini-tutorial. If you have any questions, comment me and I'll be happy to answer them. In the making of this skirt I made a mistake in that I sewed the elastic casing before the seam, without putting the elastic in, so I had to unpick it to put the elastic in and then resew it up. Sooo, if you decide to make this skirt, either sew the side seam, and then the elastic casing, (that's the way I've suggested below), or sew the casing, put the elastic through, and then the side seam.
You'll need a very stretchy fabric for this- I think mine was a stretch jersey but I am really not good with fabric types. Step 1: Cut a rectangle of fabric. The width should be 1" wider than the measurement of your hips or waist, (wherever you want the top of the skirt to fit). If you make it any wider than 1", you run the danger of the elastic bunching it too much, so that the top won't lie flat. The length of the rectangle is whatever length you want the skirt to be, plus the width of the elastic you'll be using, and an extra 1" or so for the bottom hem and to allow for the stitching of the elastic casing. I used the width of the fabric as it came off the bolt as my length. (I'm really not sure what that was though!). This photograph shows the type of stitch you'll be using. On my machine this is called a stretch overedge stitch. I'm not entirely sure what it does, but the machine manual said that it finished edges, as well as being suitable for seams on stretch fabrics which will need to be flexible. Make sure also that you have changed your machine needle to a ballpoint needle- I think that the theory goes that if you sew with a normal needle you'll break the threads of the fabric, whereas if you use a ballpoint needle, you will push them out of the way of the sewing thread. Your machine manual is the best bet for information on how to change needles and also what stitch to use.

Step 2: Sew the side seam, by folding the right side of the fabric together and stitching in a straight line as close to the edge of the fabric as possible. This will create a tube.

Step 3: On one of the width ends, use your elastic to measure how wide the elastic casing needs to be. This is basically another tube you are creating along the top of the skirt, which becomes an elastic waist band. Once you have the width, all you need to do is fold the right side of the fabric over onto the wrong side, and pin and then sew along this edge. Make sure you have just enough room to wiggle the elastic around. Oh, before this step you should have measured the elastic- do this simply by wrapping a piece around your waist or hips, (wherever you want the skirt to fit), pulling it tight and then cutting this length off. When you sew up the casing, make sure to leave a gap unsewn, so that you can slide the elastic into the casing. Use a safety pin attached to one end of the elastic to pull it through the length of the casing and back out the gap. Sew these ends together, and then finish sewing up the gap. You'll want to make sure that the elastic is sewn together very well, as it will stretch to pull on and off.

Step 4: To sew the bottom hem, you simply fold over the right side onto the wrong, and stitch this down. make sure you align the folded edge with one of the little ruler markers next to the machine's foot, so that you sew in a straight line which will be parallel to the edge on the outside of the garment. It just looks a lot neater. This is what your skirt should look like at the end if it is a maxi skirt.

You could also make a mini skirt or pencil skirt using the same method. I am going to make a black one to wear with everything, and under floaty dresses.
Well, I hope you understood all that, and happy sewing!!
helenxx

Tuesday, June 14, 2011

My First Pair of Leggings and My Helpful Assistant...

Before I blog on those, however, a short note about my little step-sister. She is model material without a doubt, and seems to finally be getting into fashion and clothes. So for her 16th birthday which was on the 4th, I decided to make her some clothes. The first trial was choosing fabric- she is at one of those impressionable stages of life where you just never know what she is going to like. I eventually decided to just go for it, getting her a beachy print for a skirt and a light white fabric, (it said cotton but it is really light and flimsy) for a top. The second trial came shortly after, when I started sewing the top and discovered my sewing machine had an appetite for the material. I could sew for only a few stitches before the fabric would be swallowed under the foot towards the bobbin. I couldn't be bothered hand-sewing at that point, so I turned to the skirt. Third trial; I thought all was going well and I only needed to do the elastic, and then I realised - the entire print was upside down. palm trees, words, boats, everything. There is no way little sis would wear an upside down skirt. Eventually I stopped crying and fixed the problems, and here is the end result;


So, onto the next sewing project! I have been wanting to make a pair of leggings for ages! Some critics have ranted about the "skankiness" of leggings, how they should be underwear or their unflattering nature. I am not of this opinion. I think semi-transparent black leggings that show the lines of their weave over fleshy shadows are gross. They are definitely unflattering. But matt black leggings can make your legs disappear, and patterned leggings, I believe, look just as good as trousers in most outfits, if a little less conservative. I have 2 pairs of leggings at the moment- a pair of dark gray woolen ones which are more darn than fabric, and a pair of ruched black ones which are unraveling from the bottom up. It is time for something new. Cue my mother, who bought me this cute print knit from Spotlight;

I used the McCalls 6173 pattern to make my leggings, choosing style B. I think these leggings could have taken me only 2 hours, if there hadn't been so many firsts. It was my first time changing my machine needle, (as I would recommend using only a ballpoint needle for knits...I think that is right), it was my first time printing and using a downloaded pattern, it was my first time sewing the crotch of something, it was my first time sewing using an over edge stretch stitch, it was really my first time sewing something other than a skirt. In the end it took me about 5 hours all up, and a lot more if you count all the times I reprinted the pattern because my boyfriend's printer is useless. I love the new leggings though- the skills I learned and how good they look absolutely justify the time they took and the distraction form household chores. Here's some pictures...
Introducing Sunshine Bayard- my boyfriend and his brother's joint-custody dog...

looking rather sheepish because she just did this, and...

this and...

this. Actually this one was a sneeze but it looked so cute and like she was trying to eat the pattern for dinner that I had to put it up. A note about Sunny- she is the most neurotic dog I have ever met; she is terrified of new people, cars, my dad, my family's tiny border terrier, vacuum cleaners, my sewing machine, basketballs, cats, dogs, the wind, rain, etc etc etc. But sometimes she gets it into her head that she is Boss, and that I am her loyal servant who must give her pats on demand. It is so damn cute :)

The crazy boy and crazy dog.

The first step...

And finished product! The fabric's pattern actually went perfectly with the top I was wearing! Fantastic.

Well that's all from me for now. Hopefully I will put up some photos of the presents being modeled soon, and hopefully the finished crocheted skirt from the last post. Comment me if you know how to crochet a waistband onto an existing skirt!
helenxx

Thursday, June 9, 2011

Bread and Butter Pudding...

I found a recipe for bread and butter pudding last year, in one of those cheap little magazines you find at Safeway. I had no idea what bread and butter pudding tasted like, but it looked delicious, so I decided to give it a go. That first one wasn't so good- the recipe was complicated, the cooking involved sitting the pudding in it's dish into a tray of water in the oven. If you see a recipe that involves that, I wouldn't even bother- the pudding top is much crisper when you don't do it, and it still cooks right through. It was also an extremely bland pudding, and while I know that was the only option during the depression and if you were poor back in the day, it really doesn't have to be that way anymore. So in that way, the first recipe did teach me a lesson- anything can go in a bread and butter pudding. It is the Irish Stew of puddings.

Knowing that, I started experimenting, and here is a recipe for one of the puddings I have made...

Step 1: Grease a casserole dish with butter.
Step 2: Cut the crusts off a lot of white bread, and spread with butter or margarine.

Step 3: Place some of the bread slices in the bottom of the casserole dish, and then sprinkle with brown sugar.

Step 4: At this point, you can begin adding whatever you want. Here I use ginger nut biscuits, crushed up, and in subsequent layers I also use crushed oreo biscuits and torn up croissant.

Step 5: Continue to layer the pudding- using a layer of bread, brown sugar, then the biscuits, fruit or other filling, then more bread and sugar, etc. Some suggestions for fillings other than what I have used here; sponge fingers dipped in coffe or coffee liquer, sponge cake, fruit bread or fruit cake, dried fruit, pieces of chocolate, various sweet biscuits, banana, hot chocolate powder or frozen berries. Anything you can think of will probably work, just make sure that any bread or cake can absorb a lot of the custard.

Step 6: In this layer I have torn up some croissant and put that over the brown sugar. Croissant is a French bread, made with heaps of butter, that is usually eaten for breakfast. I found mine at the local Woolworths, but you can also find them in most bakeries.

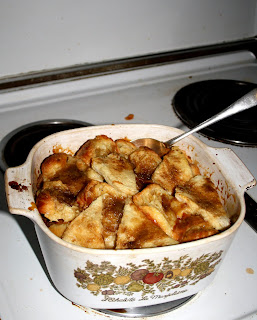
Step 7: On the last layer, to make it look pretty, cut the remaining slices of bread into triangle shapes, and layer them sticking out at an angle with whatever other bread or cake you have used. You can sprinkle sugar and cinnamon at this point as well, to make the bread come out of the oven a lovely brown colour. The cinnamon will also make the pudding aromatic.

Step 8: To make the custard, you will need 2 tablespoons of caster sugar,

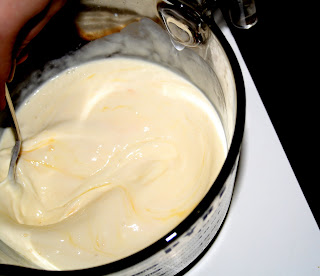
600ml of thickened cream, and 2 eggs. You can add to this some liqueur, but it is best to use a milk based liqueur such as baileys, and use only a small amount as a large amount of alcohol can prevent the custard from setting properly.

Step 9: Whisk the ingredients together in a large jug. You may need more or less custard, depending on the size of your casserole dish, so make sure you have extra ingredients sitting nearby. Once you have whisked the custard, pour over the pudding, pressing the bread down as you do so to make sure it gets through all the layers. Be sure to wet all of the top layer with custard as well so that it doesn't dry out.

Step 10: Bake for 25-35 minutes at 180 degrees Celsius. Serve hot, with ice cream. 

Well, I hope you all enjoy your puddings! Remember, go crazy! This pudding format can accommodate for almost anything you throw at it.
helen xx

Wednesday, June 8, 2011

Princess Polly and Motel Rocks rock my inspiration...

Hey guys, just checking in to show you my favourite new arrivals at Princess Polly and Motel Rocks...
Even though I don't like high necklines myself, because I think they can give an unflattering silhouette of women's breasts, I can see how this would work on a lot of girls. I wouldn't suggest wearing something like this if you had big breasts however, as the detail in the neckline would focus attention on this area. To me, this would be better as detail on the back of a neckline.

Loose shorts are in vogue at the moment, aren't they? Here is another pair I saw a while ago on Burdastyle. I think these look really cute from the front, but I can't say that I understand the attraction of this type of short from the back. If the ones I have seen around shopping centers are anything to go by, they tend to bunch up in little v's around your bum, making you look like you have a size XXXXXXXS bathing suit on underneath. I would love to be disproved though, as they do look very cute from the front, so if you can find any pictures which look flattering from all sides, (and not just on a wafer thin model), comment me!

Chiffon is another 'in' thing. I think this is chiffon... Well, anyway, I have a pattern that I think would work great as a maxi skirt in a sheer fabric like chiffon, so hopefully I'll get a chance to try that soon. I also love this ocean blue, it is so deep and romantic and whimsical. Like the dark older sister of Alice in Wonderland.

Does anyone else find capes incredibly hard to wear? They look so good on the skinny models plastered all over magazines, but on everybody else, it involves a whole lot of research. For example, will cropped capes make you look pregnant? Will longer ones make you look 4" tall? And what can you actually wear underneath them- because a cape does tend to steal the show.

I would love to be able to say that I had made this dress! However, I am planning to be inspired by the Lattice Dress I blogged about recently, and attempt something interesting and hard. I figure that this would be made of three separate pieces, the skirt, the twisted bra-ish top, and the neckline. Surely that wouldn't be too hard....

This on the other hand wouldn't be that hard, and could easily be made by opp shop finds. All you would need would be a T-shirt to turn into the stretch skirt, and an old tank top or a sheer skirt you could turn into the top. Some of the other Motel designs also feature lattice or crisscross backs, made by cutting strips of the fabric, finishing them, and then sewing them back onto the back in the desired crisscrossing pattern. Definitely worth trying, comment me if you already have.

This is another gorgeous feature neckline. I have no idea how you would make this one though! Another dress that wouldn't suit women with bigger breasts however, unless you wanted your cleavage to bulge through the sheer fabric. Which I have seen. It really isn't worth trying. Also, try to remember that anything with lines like this will probably create dents through any fat or tissue that presses against it. So if you do have big breasts, it will create something akin to a Visible Panty Line, through the vertical middle of your breast. Not very desirable.

I actually have a vintage dress similar in shape to this, except with a collar and buttons, that is waiting to be hemmed shorter. Dresses like this are great for women with small waists, especially with a belt to cinch you in even more. And that is, I am told the hourglass silhouette which men like best. On a side note, my dad has always maintained women dress better for other women, rather than to attract men. What do you think?


Princess Polly and Motel Rocks are great shopping websites which show a lot of unique and beautiful designs. ModCloth is also one to look at if you want something a little different, for inspiration, or if you have a lot of money to spend. However, I do find that ModCloth's lack of styling can make their clothing look a bit nanna-ish. I'm sure it would all look a whole lot better on. Personally, my favourite part of ModCloth is their shoe collection, they also have a good plus size range however. While you're there, check out the un-clothing parts of their site, like this book that is right on the top of my wishlist.

Well that is it for me tonight guys, I have to go and hem a skirt for my little sister. Hopefully I'll get back to posting actual projects soon!
helen xx